
Both Selenium and Cucumber are popular open source test automation frameworks. In this article, Jessica Cyrus explains how to integrate Cucumber and Selenium WebDriver which allows defining automated tests in a language that could be easier to understand outside the software testing team.
Author: Jessica Cyrus, Nex, https://www.nexsoftsys.com/
Overview
Cucumber is an open source testing tool that supports Behavior Driven Development (BDD) and it is being widely used because it provides us a benefit to write the test cases in a simple English-based language called Gherkin.
Many organizations want to integrate Cucumber with Selenium for the ease of non-technical employees. Since Cucumber helps in writing test cases and scenarios in simple English text, it becomes easy for employees like Business Analyst, Project Manager, and Manual Testers and for other non-technical persons to understand a software testing company ’s workflow. It is also beneficial when there is a need for a client to understand the application under test. Cucumber is known as Behavior-Driven Development (BDD) framework because it can help anyone, even the non-technical persons to grasp the functional behavior of deep tech products.
Integrating Cucumber with Selenium
Cucumber is basically divided in three main files:
-
Feature File: This file provides high-level information in form of test objective, test scenarios, test tags, test cases, test data etc. Below are few components that elaborates how feature file is developed:
-
Feature- Defines what all features to be tested along with their objective.
-
Scenario- Defines test steps and expected outcome for that particular test case.
-
Scenario Outline- Defines test case against different test data provided in a tabular structure separated by pipe symbol( | )
-
Tags- Defines a tag name for each scenario which helps in organizing all the test scenarios of feature file.
-
Given- Defines pre-condition of test scenario
-
When- Defines an action or interaction with application
-
And- Defines extra action related to previous action
-
Then- Defines the expected output of the test
-
Examples- Defines multiple test data for the test case written in “Scenario Outline”
-
Step Definition File: This file includes the code for test scenarios written in feature file. Annotations like Given, When, Then etc in step definition file are maps the test case steps for their code execution. For a test case to be executed it must match the test step mentioned in the feature file.
-
Test Runner File: This file acts as a driver file for your Selenium script. Test Runner file basically consists of the paths to your feature and step definition file. You can also add specific tag names which you want to execute among all of your test scenarios. It also provides you an option to add Plugin for HTML reporting.
Let’s begin now with a sample code for integrating Cucumber framework with Selenium. Below is the Maven dependencies that need to add if your POM files:
<dependency>
	<groupId>info.cukes</groupId>
	<artifactId>cucumber-java</artifactId>
	<version>1.2.5</version>
<scope>test</scope>
 </dependency>

		<dependency>
			<groupId>info.cukes</groupId>
			<artifactId>cucumber-jvm-deps</artifactId>
			<version>1.0.5</version>
			<scope>test</scope>
		</dependency>

<dependency>
			<groupId>net.masterthought</groupId>
			<artifactId>cucumber-reporting</artifactId>
			<version>3.8.0</version>
		</dependency>
While working with Cucumber, it is always good to create a different package for different java class files, this helps in better understanding of project hierarchy.

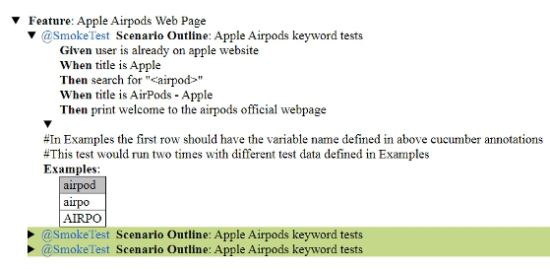
Feature File
Feature: Apple Airpods Web Page
@SmokeTest
Scenario Outline: Apple Airpods keyword tests
Given user is already on apple website
When title is Apple
Then search for "<airpod>"
When title is AirPods - Apple
Then print welcome to the airpods official webpage
#In Examples the first row should have the variable name defined in above cucumber annotations/steps
Examples:
| airpod |
| airpo |
| AIRPO |
Note: For comments, we have used hashtag symbol (#). Here are test data are “airpo” and “AIRPO”.
Step Definition File
package stepDefinitions;

import java.util.concurrent.TimeUnit;
import org.openqa.selenium.By;
import org.openqa.selenium.WebDriver;
import org.openqa.selenium.WebElement;
import org.openqa.selenium.chrome.ChromeDriver;
import org.testng.Assert;
import cucumber.api.java.After;
import cucumber.api.java.Before;
import cucumber.api.java.en.Given;
import cucumber.api.java.en.Then;
import cucumber.api.java.en.When;

public class AppleStepDefinitions {

    public WebDriver driver;

    @Before
	public void setUp()
	{
	  System.out.println("Before Hook Method Running....");
	}


	@Given("^user is already on apple website$")
	public void user_is_already_on_apple_website() {

		System.setProperty("webdriver.chrome.driver", "C:\\Users\\Lenovo-I7\\Desktop\\chromedriver.exe");
		driver = new ChromeDriver();
		driver.get("https://www.apple.com/");
	}

	@When("^title is Apple$")
	public void title_is_iPad_Apple() {
		String title = driver.getTitle();
		Assert.assertEquals("Apple", title);
	}


	@Then("^search for \"([^\"]*)\"$")
	public void search_for_airpods_by_keyword(String airpodsKeyword) throws InterruptedException {
		WebElement search = driver.findElement(By.id("ac-gn-link-search"));
		search.click();
		driver.manage().timeouts().implicitlyWait(10, TimeUnit.SECONDS);

		driver.findElement(By.id("ac-gn-searchform-input")).sendKeys(airpodsKeyword);
		driver.manage().timeouts().implicitlyWait(10, TimeUnit.SECONDS);
		Thread.sleep(2000);

		driver.findElement(By.xpath("//*[@id=\"quicklinks\"]/li[1]/a")).click();
		driver.manage().timeouts().implicitlyWait(10, TimeUnit.SECONDS);

	}

	@When("^title is AirPods - Apple$")
	public void title_is_AirPods_Apple() {
		String title = driver.getTitle();
		System.out.println("Airpods Page title ::" + title);
		Assert.assertEquals("AirPods - Apple", title);
	}

	@Then ("^print welcome to the airpods official webpage$")
	public void print_message() {
		System.out.println("Welcome to airpod official web page");
		try {
			Thread.sleep(2000);
		} catch (InterruptedException e) {
			// TODO Auto-generated catch block
			e.printStackTrace();
		}
		driver.quit();

	}
	@After
	public void tearDown()
	{
	  System.out.println("After Hook Method Running....");
	}
}
Code Walkthrough
In our step definition file, we are supposed to write an execution code for each test case defined in the feature file. In the above code, we have also used two Cucumber Hooks i.e. Before and After. The “Before” hook executes before each scenario and “After” hook executes after each scenario. Hooks are mainly used to manage the code workflow and help reduce code redundancy.
Runner File
package testRunner;

import org.testng.annotations.AfterClass;
import org.testng.annotations.BeforeClass;
import org.testng.annotations.DataProvider;
import org.testng.annotations.Test;
import cucumber.api.CucumberOptions;
import cucumber.api.testng.CucumberFeatureWrapper;
import cucumber.api.testng.TestNGCucumberRunner;

@CucumberOptions(
	features = "src/test/java/FeatureFile",
	glue = {"stepDefinitions"},
	tags = {"@SmokeTest"},
	format = {
	                "pretty",
	                "html:target/cucumber-reports/cucumber-pretty",
	                "json:target/cucumber-reports/CucumberTestReport.json",
	                "rerun:target/cucumber-reports/rerun.txt"
	        },
	plugin = "json:target/cucumber-reports/CucumberTestReport.json")

public class Runner {

	private TestNGCucumberRunner testNGCucumberRunner;

    @BeforeClass()
    public void setUpClass() throws Exception {
        testNGCucumberRunner = new TestNGCucumberRunner(this.getClass());
    }

    @Test(dataProvider="features")
	  public void my_test(CucumberFeatureWrapper cucumberFeature) 	     {
		testNGCucumberRunner.runCucumber(cucumberFeature.getCucumberFeature());
	}


	@DataProvider
    public Object[][] features()
	{
		return testNGCucumberRunner.provideFeatures();
	}


	@AfterClass
    public void tearDown()
	{
		testNGCucumberRunner.finish();

	}
}
Code Walkthrough
In our runner file, we have CucumberOptions annotation in which we have defined the paths of our feature and step definition file along with the tags name and HTML reporting Plugin.
To integrate Cucumber framework with Java TestNG framework, we have used a predefined class here called “TestNGCucumberRunner” which provides various methods such as runCucumber, provideFeatures, finish etc. “CucumberFeatureWrapper” used in a parameter of Test method is an interface for making TestNG report more descriptive.
Output

Cucumber HTML Report
Closing Thoughts
In this article, we have covered most of the features provided by Cucumber and the flow for integrating Cucumber with Selenium. Cucumber is the easiest to understand the behavior of applications under test. Cucumber first starts reading the feature file step and as soon as it gets the mapped step in step definition file, it executes the piece of code written in that particular method. This is the simplest way for sharing the work flow with your clients or client associates. So guys give it a try, you would definitely love this. For more information, have a look at Cucumber official docs as well.
Good luck & Happy Testing!!!!
About the Author
Jessica Cyrus is a software tester and QA Analyst at NEX Software and she loves to write and share the solutions article of the issues she usually faces during testing. She wrote many posts from her experience and shared them on various platforms.